Monday, March 31, 2008

Embrace Life


This is a super easy card using the beautiful Embrace Life stamp set. I also used two of the In Colors for this year---Soft Sky and Bayou Blue with just a little piece of Confetti White. My ink color is only Bayou Blue, which I used for the words and the repetition stamping on the flower piece. Repetition stamping is when you ink the stamp only once and stamp on the paper several times without reinking---this gives you a variety of shades that make it look like you used different colors. I also used Versamark for the watermark effect in the background. To add a little glitz to the card, I put a little strip of Soft Sky cardstock (get way to use scraps BTW!) and then used my 2 way glue pen and Dazzling Diamonds glitter. Like I said---quick and easy. Great when you need a card and have very little time to make it!!

Happy Stamping! Can you believe that tomorrow will be April already?!? Me either...

Wednesday, March 26, 2008

Wednesday cards...on Saturday!

Well, I started this post on Wednesday, but I am just finishing it now on Saturday. I was a little distracted!!! I did clean out my e-mail box (down from 700+ to about 50---that's pretty good, isn't it?!?)


Here are some recent cards that I have made. The first one uses a NEW stamp set from the Occasions Mini Catalog called Bloomin' Beautiful. What a gorgeous set!!! I just love flowers though. I used the Watercolor wonder crayons and applied the colors to my project with a blender pen. I love the numerous shades that can be made when doing that. Here the recipe:

Cardstock: Ballet blue, Soft Sky, Mellow Moss, Confetti White
Ink: Basic black, Ballet blue, Mellow moss
Other stuff: Ticket corner punch, blender pens and Watercolor Wonder Crayons


This is a quick and simple card that can be made with a wheel and the matching stamp set, in this case I used the Jumbo Petals Wheel and Polka Dots & Paisleys set. I rolled the wheel first then did some accent stamping. This was one of the quickest cards I've ever made!! Here's the recipe:

Cardstock: Close to cocoa, Cameo coral and Very Vanilla
Ink: cocoa and coral, plus the words done in Chocolate Chip
Other: Hodgepodge hardware in antique brass and chocolate chip wide grosgrain ribbon (I did use a mini glue dot to hold that hardware in place)

I hope that you have some time for stamping this weekend! I really have a lot of cards that I need to send to people. I really need to get stamping today!!

Monday, March 24, 2008

Name Frame EXTRAVAGANZA!!

Have you caught the Name Frame bug yet? These frames are so much fun to make, plus they are easy and inexpensive. In other words, these make GREAT gifts!! And people LOVE to receive these frames as gifts, whether they are a first name, surname, Bible verse, quote, or another word like "love", "peace", "joy", or maybe something for a holiday, like "Mom" for Mother's Day or "Merry Christmas". The possibilities are endless!!! Now the good news: I have a week full of Name Frame camps coming up. Check out my website at: http://amycollins.stampinup.net/ and click on "events" to see more details. By the way, if you are reading this and interested in attending, but unsure if you live too far away, I am near Roanoke, VA. If that is pretty close for you then you can contact me and I'll see you at camp!!

Here are a couple of frames that I created on Saturday. I didn't do names, instead I did one with the Bible verse from the new set called A Light Unto my Path and one with a saying from the new Level 3 Hostess set called Time Well Spent. These use a similar pattern and were very easy to make.
The first frame is made with some of the older, no longer available Designer Series Paper from SU! I try to keep lots of different papers on hand so that I have the perfect thing for whatever project I am working on. Have you stocked up on the Designer Series Paper yet? Of course, the paper is great for scrapbooking, but you can also use it for cards, gifts and even frames! For both frames I used the 1 1/4" square punch and most of the different papers from the pack of double sided designs.

I used the Flowers for You Designer Series Paper from Stampin' Up! (R) for this one. I purchased the frames from Michael's when they were on sale for about $3 each. I just always keep my eyes open for any frame that might work to decorate. You might even have some old frames around your house that you could dress up with a little pretty paper and rubber stamping!!!

Have a wonderful Monday!! I would love to hear your thoughts about these frames or any other projects that I have shared on my blog. It's so easy to leave a comment. Just click on the spot with "# comments" in the lower right of each new post and it will take you to a new screen. You don't have to have a blogger account to leave a comment, just use "anonymous", but make sure to put you name and contact info in the actual comment in case I need to reply to you. Happy Stamping!!

Sunday, March 23, 2008

Spring flowers, cards and frames

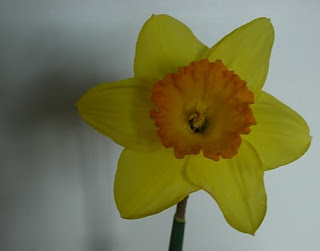
Spring is on it's way!!! I love seeing all the beautiful flowers coming up all around the yard. Here is a picture of one of our many varieties of daffodils. Isn't it beautiful? I just wanted to share a flower with you on Easter. By the way, HAPPY EASTER!! I pray that you are celebrating the Resurrection of our Lord and Savior Jesus Christ today.


That brings me to the card that I have to share today. It is an Easter card. I used the background stamp called French Flair. My colors are Perfect Plum and Sage Shadow. I used markers to color directly on the stamp, so that I could make the swirls sage and the birds plum. :o) Then I stamped the "Easter Wishes" stamp from the All Holidays set with plum on sage and punched it out with the Designer Label Punch. I made this same card as a birthday card by just changing the words that I used. It really turned out great and is very quick and easy!! This is a great background set which coordinates with the Carte Postale stamp set. Have you gotten these yet?

And last for today is this frame that I made yesterday. I found these great frames at Kroger for only $5!! It is a shadowbox frame that came with words on the glass and mat that said "family", "love" or "friends" in black. And I immediately thought how great these would be with Stampin' Up!'s (R) new RUB-ONS!!! What fun these are---and super easy to do. This frame took me only about 30 minutes to create. I used the Cherished Memories rub-ons for it. I placed the swirls directly on the glass, but I did the word "cherish" on the white mat inside, giving this frame more depth. I then used some of the flowers, pearls and rhinestone brads from the Pretties Kit. To color the flowers I used sponge daubers and different colors of ink. Just make sure that you kind of rub the ink on the flowers not just mash it straight down. Trust me---by mashing it you just get colored circles!!! :o) To attach the pearls, I used Mini Glue Dots. To put the flowers on the mat, I used Stampin' Dimensionals. I apologize that the picture quality is not the best on this shot. I really had trouble with trying to get a good picture without the glare of the flash.
Well, I am off to spend some time with my FAMILY now. Have a wonderful day!! Keep on stamping and I look forward to seeing you at one of my events soon. :o)

Thursday, March 20, 2008

An oldie, but a goodie


Here is a card that I made a couple of years ago, but I still just LOVE it!! I used the Summer by the Sea stamp set. It is not actually in the catalog, but it is on the "dormant" list, which means that it is still available although not pictured in the catalog. (It costs $30.95. HERE is a link that I hope works for you to see all the other sets that are available on the dormant list.) It is one of my all time favorite sets. Print Pattern is also used for the cool background effect.

For the Print Pattern, I used markers in Pretty in Pink and Certainly Celery and just colored around the edges of each little diamond---time consuming, but worth it for the effect!! The main image is just stamped in basic brown, then colored in with blender pens and the same pink and celery inks. I used a buckle from the hodgepodge hardware and pink grosgrain, pink gingham and white grosgrain ribbons. A mini glue dot holds the ribbons in place. The card base is Certainly Celery and the layering on top is done with Pretty in Pink and Naturals White.

I think that I am ready for the warm weather and the beach, how about you? By the way, Happy Spring!!! I just realized that TODAY is the first day of spring. Make it a wonderful day!

Tuesday, March 18, 2008

Another day----another card!


I hope that you put in your Stampin' Up! order and were able to receive one (or more) of the Sale-a-Bration sets for FREE! This card is made with two of those SAB sets, one is called Merci (the butterflies) and the other is called Lots of Thoughts. I also used the Scallop punch which is so much fun to use!!! I highly recommend it. I used blender pens and bold brights inks to color in the butterflies after stamping them in basic black ink. My basic colors are Pixie Pink, Pink Passion, and Naturals White. For the words I used the Omission technique with the words set---by that I mean that I used a marker to only color in the part of the stamp that I wanted to use for my project---I omitted the other parts! Very cool and easy to do. I hope you like this card.

SAB is over now, but there are lots of promotions going on right now, for example: hostess a SU! show with at least $35o in sales and get an EXTRA $25 worth of merchandise for FREE!!! You can't beat that deal. Contact me if you are interested in doing a show---in your home, my home or maybe just a catalog show! Happy Stamping to you!!

Monday, March 17, 2008

Here is a card...finally!

Here is a beautiful card that my daughter Emily created. She used the Heartfelt Thanks stamp set. Her color scheme was Lovely Lilac, Almost Amethyst and Confetti White. She also used Certainly Celery (I think) and Always Artichoke for the stem and leaves and So Saffron for the flower center. The cute little "Thanks" is done by first inking with the amethyst then use the lilac marker and coloring on top of just the middle part. Around some of the edges she used the cutter kit and roughed it up a little bit. And don't you just love how she tilted that piece of cardstock for such a unique look?!? I would never have done that on my own, but it is beautiful and I just love it!!

I located my camera again today and so I should have some more pictures coming for you soon!! Have a blessed day!

Wednesday, March 12, 2008

I'm still alive...

I apologize for seeming to drop off the face of the earth. I didn't get any pictures of my projects taken, then I went out of town for several days, then my husband had bilateral hernia surgery yesterday.....So I have been out of touch. Please accept my apologies. I will try to post some new projects in the next few days. By the way, my husband's surgery went really well (just in case you were wondering!).


I hope that YOU have had some time to stamp, unlike me. Take care and I'll post again soon!